Leica Palileo

Leica

Director of Customer Success at wizy.io.

Thank You For Making Form Workflow Plus A Part of Your Success!

No comments

Many companies, organizations, and educational institutions use Form Workflow Plus every day to manage their internal processes. 

We are thankful to our loyal customers for continuing to use Form Workflow Plus and making us a part of their success. 

Here’s what our customers are saying about us*: 

“This is a great, simple-to-use product that my organization uses for approving fund requests. The best thing about WF+ is their support: They have FAQs and guides that will help you set everything up. Their support team has responded to my questions within a day.”

—  Form Workflow Plus Add-On User, 25 August 2019 (Source: G Suite Marketplace Listing for Form Workflow Plus Add-On)

“We have been using Form Workflow Plus for about a year now and it has been a great tool. We were looking for something that would route google form requests to specific people for approval, based on a field in the form response, and this was by far the most user friendly add-on that had exactly what we needed.

While we have had a couple minor issues over the year (mostly user error), wizy.io customer support is amazing. They are friendly, very fast to respond, and completely resolve any issues.

If you are looking for a workflow approval process for your online forms, but don’t want to go the expensive software route, I highly recommend this add-on.” 

— —  Form Workflow Plus Add-On User, 2 October 2019 (Source)

“This app has been helpful in streamlining a very confusing approval process for us. Most importantly, the customer support team (especially Marko) has been so incredibly supportive anytime we have questions or need help with an issue. Thanks for being so helpful and quick to respond!” 

—  Form Workflow Plus Add-On User, 2 October 2019 (Source)

“Having using this company’s G Merge Mail Merge add-on I was already familiar with the high quality of their products. So when the need arose for automated approval workflows in our org I immediately thought of this app. It hasn’t disappointed – it’s exactly what we need for so many situations. As a fully Google G Suite district we don’t want to reinvent the wheel with third-party sites or apps for workflows, so this tool fits the need perfectly. There’s a bit of a learning curve to setting up workflows, but it integrates very easily into Google Sheets and the dashboard is very good. We’re going to use the heck out of these workflows! …. 

“Overall this tool will save us countless hours for relatively little money! Well worth it.” 

— Douglas Alexander, 22 October 2019 (Source: Source

“I really appreciate the help and how deep the issues are looked into. Even though the issue wasn’t resolved perfectly, he found an acceptable solution and we are very satisfied. Keep up the great work :)”

— (Source: Customer Satisfaction Survey from customer ticket)

*NOTE: Some reviews are kept anonymous due to permissions and/or the sensitive nature of the reviewer’s organization.) 

If you’re using Google’s G Suite, give Form Workflow Plus a try, too, by installing our Google Sheets add-on (if you’re creating and managing workflows) on the G Suite Marketplace and add users (admins, approvers, or request submitters) to our standalone web application

We offer a free trial for two weeks without asking for your credit card information (and in fact offer flexible payment options. Our customer success team can also offer demos and video walkthroughs for you if you have any special requirements not found in our Help Center

Leica PalileoThank You For Making Form Workflow Plus A Part of Your Success!
Read more

Create Professional Email Templates with the G Merge Plus Drag-N-Drop Editor

No comments

When we released G Merge Plus, one of the new features exclusively available in this new version is the Drag-N-Drop Email Editor, which makes it easy to create professional-looking newsletters, marketing materials, and event or announcement emails. 

Templates made simple

The Drag-N-Drop editor is different from the original Simple Editor in that it uses a “What you see is what you get” (WYSIWG) interface where you simply drag components from the sidebar into your main template, and insert or modify the content accordingly. 

To start creating fresh templates, all you need to do is sign in to //app.gmergeplus.com and click on the “Templates” link at the top. Click the + sign to create a new email template, and select “CREATE WITH DRAG-N-DROP EMAIL EDITOR.” 

Instant formatting for content

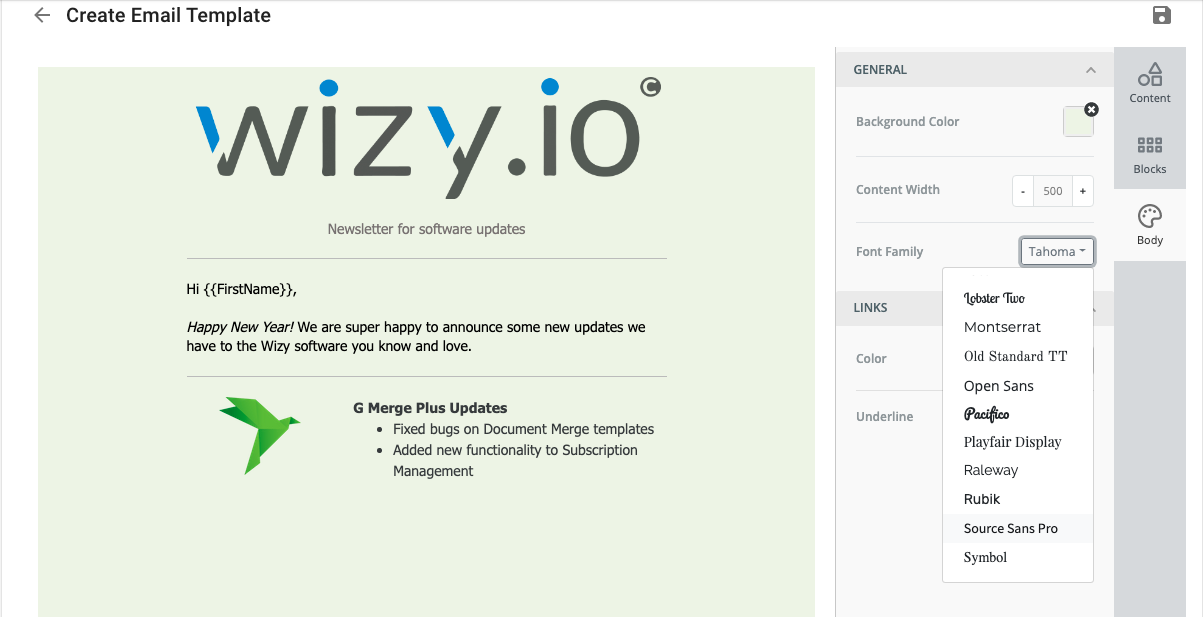
The Drag-N-Drop Editor has two components: the main template on the left side which shows you how your email is going to look, and the sidebar on the right side from where you can select and tweak the settings and content.  

The building blocks of your email template

The right sidebar has three tabs: Content, Blocks, and Body. 

  • Content 
    • Columns – various column counts and widths
    • Button – add and format a clickable button
    • Divider – add a divider bar to segregate content
    • HTML – a source code box for those who know to format with HTML
    • Image – insert an image
    • Text – add a text box
  • Blocks 
    • Modular arrangements of content with varying columns and widths you can arrange per row
  • Body
    • Background color – pick a background color from the palette
    • Content width – define how wide or narrow your content will be
    • Font family – select the typeface to apply to your email
    • Link color – the color of the clickable links
    • Underline – choose to show links with an underline or not

Templates in a few easy steps

Let’s create a sample newsletter to show how simple it is to use the editor. 

First, select the “Image” box and drag it to the left. 

You can then upload an image to the template, usually a banner or header containing your company logo or topic. 

Click “X” when done and select the next component.

In this case, let’s add a text box by dragging the text into the next row. 

Then, click on the text box and type in the email topic, a “Newsletter for software updates.” Note that you can format the text as you wish with the available formatting options both above the text box and the right sidebar. 

Then you can add a divider, which you can also format. 

To add the next sections, you can add blocks with a narrower column to the left for the logo and some text updates on the right.

Now you can click on the “Add Content” buttons inside the columns to add the content, or you can drag other content blocks onto them. 

In this case, we’ll drag the “Image” box on the left side and add the G Merge Plus logo, and drag the “HTML” box on the right side where we can add some bullet point updates about G Merge Plus. 

Looking good! But wait, let’s personalize our newsletter so that we address our customers properly. We can drag a text box below the divider and above the content, then add tags from our spreadsheet. 

We can also customize the background of the email. In this case, the G Merge Plus theme is light green, so we can click on the “Body” tab on the right side to pick the right color. We can also change the font if we wish. 

Now our template is looking good! But how does it look on mobile devices? You can click the preview button at the bottom left corner of the editor.

You can then toggle between the mobile and desktop previews of your newsletter. 

And when you’re done, simply save your template by clicking the Save icon on the upper right corner. Don’t forget to add the Subject Line to your email. 

Load it up from the G Merge Plus add-on

To use your new template, simply go to your spreadsheet, run G Merge Plus, and under Mail Merge > Email template > click “select/create” and use the template you’ve just created. (You should be able to easily see which ones were created using the Drag-N-Drop Editor.)

As simple or as complex as you want it to be

As you can see, it doesn’t take much to create your own email templates like a pro. If you’ve shied away from using banners, tables, or multiple columns, you no longer need to fear because the Drag-N-Drop editor makes it so easy for anyone to use. 

For those who DO have advanced knowledge of HTML, you can format as you please within the HTML box. 

Do feel free to give our Drag-N-Drop editor in G Merge Plus a try and please leave a comment below or get in touch with us if you have any questions or would like a demo!

Leica PalileoCreate Professional Email Templates with the G Merge Plus Drag-N-Drop Editor
Read more

New Feature: Enable Additional Column for Workflow Management in Form Workflow Plus

No comments

Have you ever managed an approval workflow and wished you could add notes to Approved requests? Have you ever needed to take action on those approved requests and wanted to keep track of these details on your workflow management page?

As of today, you can now do this all on Form Workflow Plus!

We’ve now added a feature for any Creator or Admin of a workflow to be able to add an optional note column to each of your workflows. You can name this column anything you want, and add data to the column for each request. 

Enable notes for your workflows

First, log on to the Form Workflow Plus web application at //app.formworkflowplus.com

Then, while Manage Workflows is selected on the left sidebar, select the workflow you’d like to manage. (In this example, we’ll use “Customer Success Leave Requests”). 

Next, click on the “SETTINGS” tab at the top, and then toggle the switch next to “Enable note column” to add a column to your Worfklow page under Manage Workflows. 

A confirmation message should flash at the bottom left corner of your screen that says “The additional column will now be displayed.” 

Optionally, you can change the name of the column to what makes sense for your workflow. (In this case, we’ll name our column “Manager Remarks”.)

Adding notes to your new column

You should now see your new column in your workflow, under the “RESPONSE” tab. 

To add data in this column, simply click on any Approved request, select the “CONTENT” tab, and add a note at the bottom under the column name (in this case, we’ll add under “Manager’s Remarks” some information about the employee’s remaining leave credits.)

You asked for it, you got it!

This feature was requested by one of our customers, and we thought it was a fantastic idea because it’s something we could use ourselves. 

How does Form Workflow Plus make your workday better? Please sound off in the comments below!  And do continue to reach out to us for any feature requests or assistance and our Customer Success team would be more than happy to help or provide demos. 

Leica PalileoNew Feature: Enable Additional Column for Workflow Management in Form Workflow Plus
Read more