
When we released G Merge Plus, one of the new features exclusively available in this new version is the Drag-N-Drop Email Editor, which makes it easy to create professional-looking newsletters, marketing materials, and event or announcement emails.
Templates made simple
The Drag-N-Drop editor is different from the original Simple Editor in that it uses a “What you see is what you get” (WYSIWG) interface where you simply drag components from the sidebar into your main template, and insert or modify the content accordingly.
To start creating fresh templates, all you need to do is sign in to //app.gmergeplus.com and click on the “Templates” link at the top. Click the + sign to create a new email template, and select “CREATE WITH DRAG-N-DROP EMAIL EDITOR.”

Instant formatting for content
The Drag-N-Drop Editor has two components: the main template on the left side which shows you how your email is going to look, and the sidebar on the right side from where you can select and tweak the settings and content.

The building blocks of your email template
The right sidebar has three tabs: Content, Blocks, and Body.
- Content
- Columns – various column counts and widths
- Button – add and format a clickable button
- Divider – add a divider bar to segregate content
- HTML – a source code box for those who know to format with HTML
- Image – insert an image
- Text – add a text box

- Blocks
- Modular arrangements of content with varying columns and widths you can arrange per row

- Body
- Background color – pick a background color from the palette
- Content width – define how wide or narrow your content will be
- Font family – select the typeface to apply to your email
- Link color – the color of the clickable links
- Underline – choose to show links with an underline or not

Templates in a few easy steps
Let’s create a sample newsletter to show how simple it is to use the editor.
First, select the “Image” box and drag it to the left.

You can then upload an image to the template, usually a banner or header containing your company logo or topic.

Click “X” when done and select the next component.
In this case, let’s add a text box by dragging the text into the next row.

Then, click on the text box and type in the email topic, a “Newsletter for software updates.” Note that you can format the text as you wish with the available formatting options both above the text box and the right sidebar.

Then you can add a divider, which you can also format.

To add the next sections, you can add blocks with a narrower column to the left for the logo and some text updates on the right.

Now you can click on the “Add Content” buttons inside the columns to add the content, or you can drag other content blocks onto them.

In this case, we’ll drag the “Image” box on the left side and add the G Merge Plus logo, and drag the “HTML” box on the right side where we can add some bullet point updates about G Merge Plus.

Looking good! But wait, let’s personalize our newsletter so that we address our customers properly. We can drag a text box below the divider and above the content, then add tags from our spreadsheet.

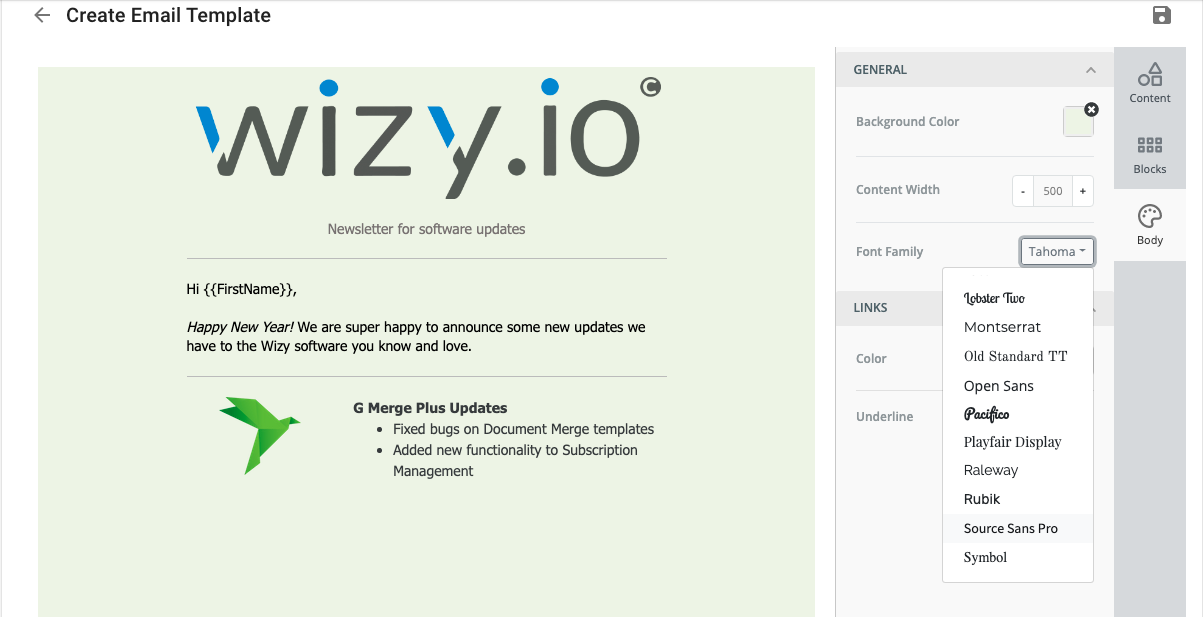
We can also customize the background of the email. In this case, the G Merge Plus theme is light green, so we can click on the “Body” tab on the right side to pick the right color. We can also change the font if we wish.

Now our template is looking good! But how does it look on mobile devices? You can click the preview button at the bottom left corner of the editor.

You can then toggle between the mobile and desktop previews of your newsletter.


And when you’re done, simply save your template by clicking the Save icon on the upper right corner. Don’t forget to add the Subject Line to your email.

Load it up from the G Merge Plus add-on
To use your new template, simply go to your spreadsheet, run G Merge Plus, and under Mail Merge > Email template > click “select/create” and use the template you’ve just created. (You should be able to easily see which ones were created using the Drag-N-Drop Editor.)

As simple or as complex as you want it to be
As you can see, it doesn’t take much to create your own email templates like a pro. If you’ve shied away from using banners, tables, or multiple columns, you no longer need to fear because the Drag-N-Drop editor makes it so easy for anyone to use.
For those who DO have advanced knowledge of HTML, you can format as you please within the HTML box.
Do feel free to give our Drag-N-Drop editor in G Merge Plus a try and please leave a comment below or get in touch with us if you have any questions or would like a demo!


Recent Comments